There are many different data points that can be used within apps built on Mobsted. All of these data points are referenced using the #Hashtag# notation, which pulls in the needed data piece all parts of Mobsted platform, like from a local app's storage, from a session, from Mobsted backend or from an API operation.
Hashtags are used in elements' properties in Constructor (in most fields of most elements, for example input fields, actions, etc ), API Operations, API Providers, API Methods, Filters and when sending messages to application users.
Hashtags can be created manually or automatically via Hashtag generator function in Constructor.
1. How and Where its Engaged
Every where you see the sign # - you can call the generator and find a piece of data you need.
2. Which Data Points are Available
Hashtag generator works for the below parts and functions of the platform:
Application
Backendname
Event
LastEvent (last event created on app user action)
Filter
Object
API Operation
Screen
System
Tenant
Variable
- Lists of Tables (Custom Data Tables)
When entering Hashtags manually make sure the text contains no spaces otherwise they won't work.
Some hashtags work for app users or for platform users (admin part) only. Please, pay attention to relevant notes to the sections below.
3. Hashtags Usage Examples
User Interface
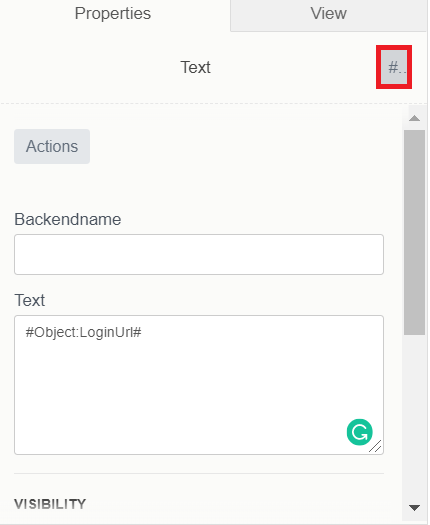
Hashtags are used to display, or execute upon, Object data from a needed column. Here is a sample of simply displaying data:
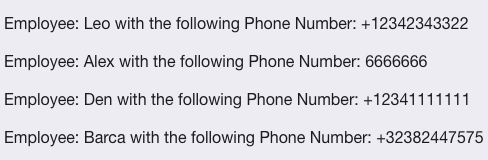
Constructor View - #Object:Name# | Application User View - resulting data pulled from Object's column "Name" |
|
|

API Providers
Hashtags are used to pass data into API call parameters, for example, #Backendname:city# in the sample below:

This sample is taken from another article - Using API calls.
Sending personalized messages to app users:

This is a sample of messaging block of the platform.
Custom JS
Hashtags are used to pass data into Custom JS code, for example to call a native Share link function, and track which objectID does most sharing you can add a hashtag into Custom JS, like in the sample below:
const share = function(){
navigator.share({
title: 'mobsted.com',
text: 'Check out the Mobsted platform',
url: 'mobsted.com/?utm_referer=#Object:objid#
})
.then(() => console.log('Successful share'))
.catch((error) => console.log('Error sharing', error));
}

if (navigator.share) {
document.getElementById("btnShare").onclick = share
} else {
document.getElementById("btnShare").onclick = () => alert('Sharing does not work');
|
|---|
In this case the #Object:objid# will be pulled in by the JS function.
4. Available System Wide Hashtags
We try to have this list up to date, however there is good chance there are more hashtag references available on the platform, as new ones are added often.
CURRENT TENANT (MOBSTED ACCOUNT)
#Tenant:Name# - tenant name
#Tenant:UserName# - name of tenant creator(Client) specified at registration
#Tenant:MobileNumber# - phone number of tenant creator(Client) specified at registration
#Tenant:Country# - country of tenant creator(Client) specified at registration
#Tenant:LastModified# - date of the last change made in the tennant
#Tenant:PrimaryEmail# - email of tenant creator(Client) specified at registration
#Tenant:CompanyName# - company name
SYSTEM
#System:SentSMSCount# - number of SMS sent in the current tenant
#System:SentEmailCount# - number of Emails sent in the current tenant
#System:SentPushCount# - number of Push notifications sent in the current tenant.
CURRENT APPLICATION
#Application:id# - app unique identifier
#Application:Name# - app name when stored on a mobile device
#Application:DateCreate# - app creation date and time
#Application:ThumbImageUrl# - link to the image used as app icon
#Application:EmailPhone# - identification type: Email or Phone Number or empty if none of these specified
#Application:PIN# - if the PIN code is set to log in to app, can be 1=YES or 0=NO
#Application:CreateObjects# - auto-create object on accessing app, can be 1=YES or 0=NO
#Application:Everytime# - request to enter IP or PIN on user return after time out (Return visitor timeout security setting), can be 1=YES or 0=NO
#Application:EventNotify1# - type of initial notification: Email=Email, SMS=Text Message, Push=Push or Not Selected if not specified
#Application:EventNotify2# - type of second notification:
Email=Email, SMS=Text Message, Push=Push or Not Selected if not specified
#Application:EventNotify3# - type of third notification: Email=Email, SMS=Text Message, Push=Push or Not Selected if not specified
#Application:DesktopName# - app name on Mobsted platform
#Application:IP# - access security configuration status IP address (used with parameters subnet mask 1 and 2), can be 1=set to on, 0=set to off.
#Application:Mask1# - subnet mask 1 (with IP address security setting enabled)
#Application:Mask2# - subnet mask 2 (with IP address security setting enabled)
#Application:return_visitor_timeout# - time period in seconds set before requesting PIN or IP address check with PIN or/and IP address security setting enabled.
CURRENT SCREEN
#Screen:id# - screen unique ID
#Screen:Name# - screen name
#Screen:SortOrder# - sequential screen number created in Constructor
#Screen:DateCreate# - screen creation date
#Screen:LastModified# - the date of last change made to screen
#Screen:ishomescreen# - current screen is Home screen = true, not Home screen = false.
Screen hashtags will ONLY work for app users, in API operations called by app users and in filter results requested by app user. As these need screen context.
VARIABLES
#Variable:myvar123# - value that is stored in any variable you create in the app, in this case - "myvar123" variable. For more information on Variables, please, refer to Variables article.
Variables ONLY exist in user's session. Which means passing variable in hashtag anywhere, like to API operations or Filters, must be done from the app's user perspective. In case you need that data somewhere on a backend, you must use intermediary to store user's variables, like Lists of Tables.
CONSTRUCTOR ELEMENTS BACKENDNAMES
This is very similar to variables, but allow to ID data from a particular element, like a button or select or text input.
#Backendname:name# - backendname set for Text input element to reference the data entered by app user

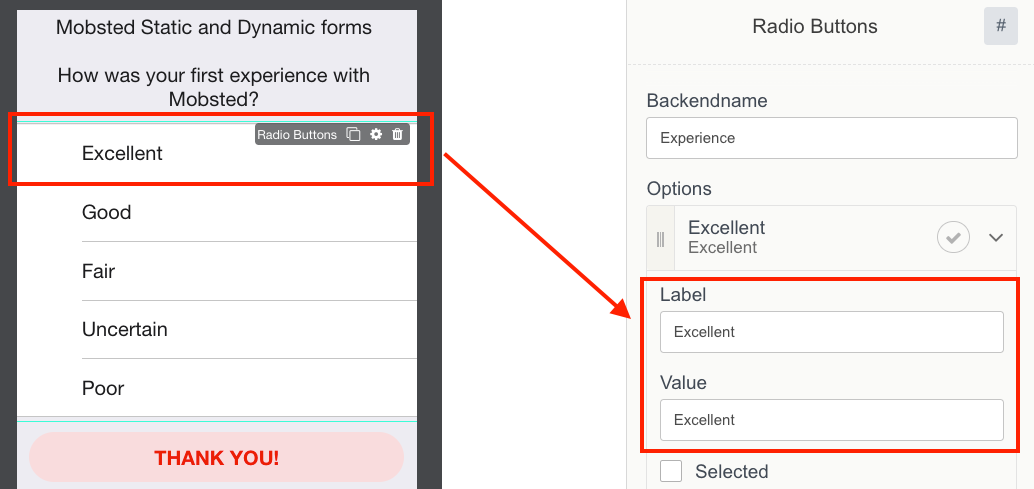
#Backendname:radio:label# - LABEL of the option in Radio Buttons element selected by user ("radio" is the Backendname of Radio Buttons element). Example: use #Backendname:radio1:label# to reference the second radio element label
#Backendname:radio:value# - VALUE of the option in Radio Buttons element selected by user ("radio" is the Backendname of Radio Buttons element). Example: use #Backendname:radio1:value# to reference the second radio element value
Checkboxes:
Use #Backendname:PolicyAgreeCheckBox[0]:label# to reference the label of the first selected element
Use #Backendname:PolicyAgreeCheckBox[0]:value# to reference the value of the first selected element.
CURRENT OBJECT
#Object:id# - object unique ID
#Object:PIN# - login PIN if PIN is set in user access settings
#Object:Phone# - object phone number
#Object:Email# - object email
#Object:CreateDate# - object creation date
#Object:LoginUrl# and #Object:InviteUrl# - personal short link to enter the app on behalf of the object. #Object:InviteUrl# is used for app distribution to new users
#Object:Enabled# - object Status, if 0 - the object will not be able to access the app (requires to make settings in Enabled column in Objects)
#Object:LastLogin# - last date the app was accessed by the object
#Object:InviteStatus# - status of an invite sent to the object
#Object:Timezone# - current time zone
#Object:AutomaticalTimezone# - set automatic time zone, can be ON=1 or OFF=0
#Object:LastModified# - last date when object's data was changed
#Object:anyColumnName# - reference to any custom column created in Objects
#Object:FacebookChannel# - FB bot enabled=1, not enabeld=0
#Object:TelegramChannel# - Telegram bot enabled=1, not enabled=0
#Object:ViberChannel# - Viber bot enabled=1, not enabled=0
#Object:VKChannel# - VK bot enabled=1, not enabled=0
#Object:NotifyPush# - Chrome push enabled =1, not enabled =0
#Object:NotifyEmail# - Email push enabled =1, not enabled =0
#Object:NotifySMS# - SMS push enabled =1, not enabled =0
#Object:anyColumnName123# - reference to any custom column created in Objects.
FILTERS
#ObjectsFilter:FilterName: FilterValue# - get data on Objects filter
#EventsFilter:FilterName: FilterValue# - get data on Events filter
Where FilterName is filter's unique name.
In the hashtags above FilterValue can have the following values:
Value - filter value
Count - number of records that apply to the filter
Data - all filter records
Value - value for aggregated data (record count, max, min value)set in filter
Filter hashtags can use Self modifiers:
SelfData
SelfValue
SelfCount
Self modifiers allows to set additional filtering conditions on specified Object parameters.
For example: #EventsFilter:FilterName:FilterValue:SelfData:id# will return records applicable to current Object only.
Object column referenced in Self modifier must contain data, otherwise the filter will not work.
HASHTAGS TO MERGE FILTERS
Each filter can contain either AND or OR conditions. In order to merge OR and AND conditions use hashtags to one filter within the second filter.
Example: we created the filter that displays users with email on Mobsted OR Outlook domain, and who has US phone number.
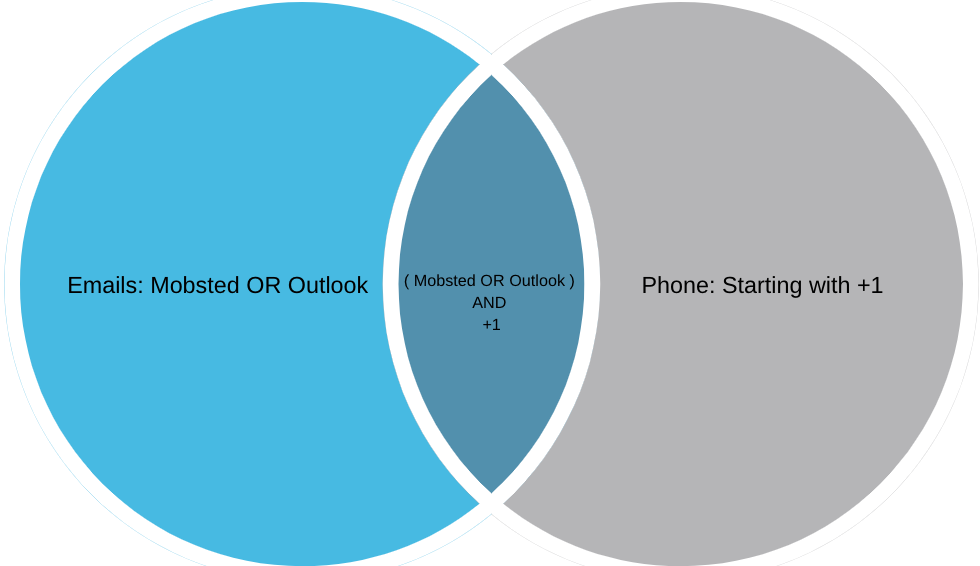
First filter will contain the required Email condition, we will name it as "Email"

Second filter will contain the required Phone condition merged with the condition filtering Emails that falls into the first filter
#ServerSide:ObjectsFilter:Email:Data@join(",", "objects@Email")# - where "Email' is the first filter's name.

Object column for join action must contain some data, and not be empty. For example, you can use "objects@id" instead of "objects@Email" at the end of the hashtag or any other column which already participates in filtration.
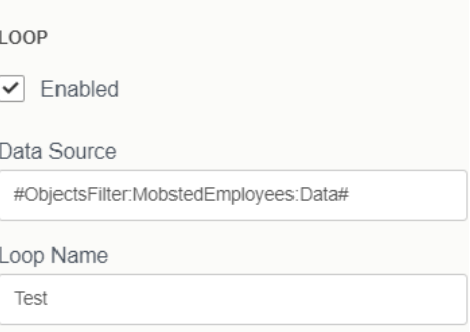
LOOPS
Loops hashtags can be created only manually.
#ObjectsFilter:FilterName:Data# - creating loop which contains data based on Objects filter
#EventsFilter:FilterName:Data# - creating loop which contains data based on Events filter
#Operation:OperationName:Response:Result:0:response:holidays# - creating loop which contains data on API Operation (read more about API Operation hashtags in API operation section)
Example: creating a loop with Object filter reference.
Referencing Loops:
#Loop:LoopName:OperationParameterName# - referencing the repeated element of API Operation that is specified in LoopName
#Loop:LoopName:objects@Phone# - referencing Phone column of Objects based on filter that is set in LoopName.
Example: displaying Objects columns which fall under Filter condition.
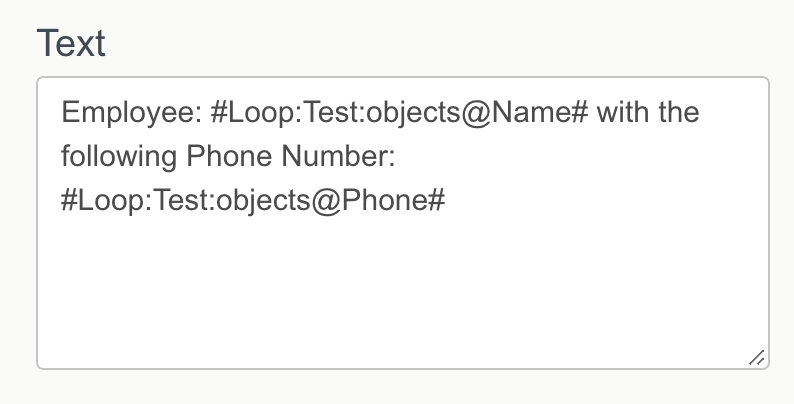
Resulting in the following looped data:
EVENT
Event hashtags are available in Triggers' operations only.
#Event: id# - Event id
#Event:Value:EventFiledName# - data from the specified field name in Event Value column
#Event:ActionName# - event action name.
LAST EVENT
LastEvent hashtag returns data from last event created on app user action.
LastEvent hashtags are available everywhere except Triggers' operation.
#LastEvent:id# - Last Event id
#LastEvent:Value:EventFiledName# - data from specified field in Event Value column
#LastEvent:ActionName# - Last Event action name.
API OPERATIONS
#Operation:OperationName: Response:Code# - HTTP status code after executing the operation
#Operation:OperationName: Response:Result[0].value# - data received as response to the operation execution ([0] - this array contains the entire response to the API request. Nesting can be multi-level, nesting levels are separated by a dot OR semicolon
#Operation:OperationName: Error:Code# - HTTP status code (in case of error), after performing the operation
#Operation:OperationName: Error:Result[0].value# - data received as response to the failed operation execution ([0] - this array contains the entire response to the API request. Nesting can be multi-level, nesting levels are separated by a dot OR semicolon.
Where OperationName – operation name assigned in the list of operations upon creation.
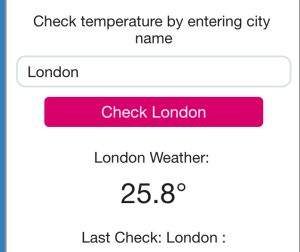
Example: you can ran an operation to check weather in London and recieve the following data:
{
"meta": [],
"data": {
"Response": {
"Result": [{
"location": {
"name": "London",
"region": "City of London, Greater London",
"country": "United Kingdom",
"lat": 51.520000000000003,
"lon": -0.11,
"tz_id": "Europe\/London",
"localtime_epoch": 1555318097,
"localtime": "2019-04-15 9:48"
},
"current": {
"last_updated_epoch": 1555317913,
"last_updated": "2019-04-15 09:45",
"temp_c": 9,
"temp_f": 48.200000000000003,
"is_day": 1,
"wind_mph": 15,
"wind_kph": 24.100000000000001,
"wind_degree": 90,
"wind_dir": "E",
"pressure_mb": 1023,
}
}, 200, { ... }],
"Code": 200
},
"Error": {
"Result": [],
"Code": 0
}
}
}
|
|---|
Please Note:
you can refer to the element of the array by using [array element number]
use dots instead of colons to refer to a nested JSON element.
If you were to set up this hashtag in a weather in app, you can set up the following hashtag call in app to display : #Operation:weatherOperation:Response:Result[0]:current.temp_c#, where "current.temp_c" refers to the name of an array "current" (see ABOVE api response) and it's needed element - "temp_c".
To see which data points in API response you need to refer to, you can check the structure of the received data (after performing the operation) via Hashtag generator.
This check requires having the API method as already set in your INTEGRATION section of Mobsted. The Weather example API method is available by default.
LISTS OF TABLES (CUSTOM DATA TABLES)
The FULL general form of the hashtag to call on custom tables is the following:
#List:list_name:table_name:N:column_name#
Where: "List" is the initiation line telling the system to look into lists of tables data. "list_name" is the custom name you give to your custom list of tables "table_name" is your custom name of the needed table within the list "N" is the ID of the ROW within the table "column_name" is the custom name of a column |
|---|
The full form returns to the exact data cell.
The List's hashtags can be used in it's partial form to pull in arrays of data from the table:
- #List:list_name:table_name# - returns the table in full, and is often used with ONE column tables
- #List:list_name:table_name:N# - returns the specified ROW from the table, with all the columns
You can also use a hashtag WITHIN a hashtag to make more dynamic data calls, as shown in the example below, taken from the Task Manager sample app (located in your account):
You can see that the hashtag used in the Constructor (marked Red) of the app, has this form (marked Green) -

Now, look into this hashtag - #List:languages:translation:3:#Backendname:Language##, open the Lists of Tables (marked Red), click down to Languages > Translations. You can see that the first part (in bold) of the hashtag fully repeats the route to the table.

Now - look at the second part of the hashtag #List:languages:translation:3:#Backendname:Language## ( in bold again). Each row stores how each piece of text in app is in every language. Then a column is requested using another hashtag, from a backend element's name, where use sets his own language. Note that in this case you user a double ## at the end to "close" both hashtags, just as with spreadsheet formulas.
CURRENT URL - ROUTE
Current page route (URL) will pull into the application any information located in the incoming/open/current URL. This is often used to pass data between applications without any complex integration.
#Route:fullPath# - absolute path
#Route:path# - relative path
#Route:query:appid# - application ID
#Route:query:screenid# - screen ID
#Route:query:os# - OS the application was launched on (iOS / Android). Will be detected automatically if not specified
#Route:query:objid# - current Object ID
#Route:query:ref# - referrer. Possible options:
ref=PWA - application was launched from Home Screen
ref=vcard - application was launched from Contacts
ref=sms
ref=email
#Route:query:Custom_Parameter# - custom parameters that can be passed from external systems. Example: #Route:query:paymentSuccess=1#, or #Route:query:utm_referer# to read off the "objectid" info sent from the Custom JS example in Section 3 above.
Related articles
Related articles