This functionality allows using Google's SSO service to register and/or login users into your applications. More SSO connectors are coming soon.
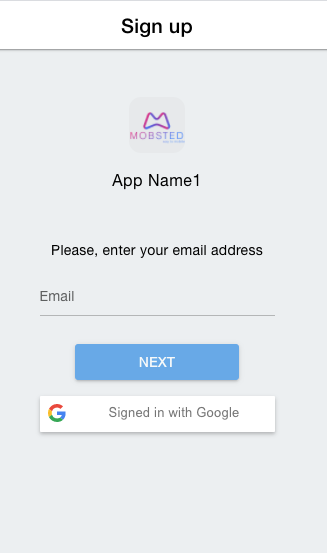
Here is an example of how the login page will look in this case:
1. Important Notes
NOTE 1 - If your company uses Google as an email provider, you will be able to use this service within your domain.
NOTE 2 - We provide a default Google auth account, free of charge, however, if you want to use your own email to control all auth, follow the instruction below.
NOTE 3 - Mobsted platform allows not just registering new users with their Google accounts (as it is done with most systems), but also to ADD this auth type to EXISTING users, so they can log in quickly without using any SMS or email or passcodes.
2. Creating a Google Auth account
1) Login into your Google account, which will be used to provide auth service
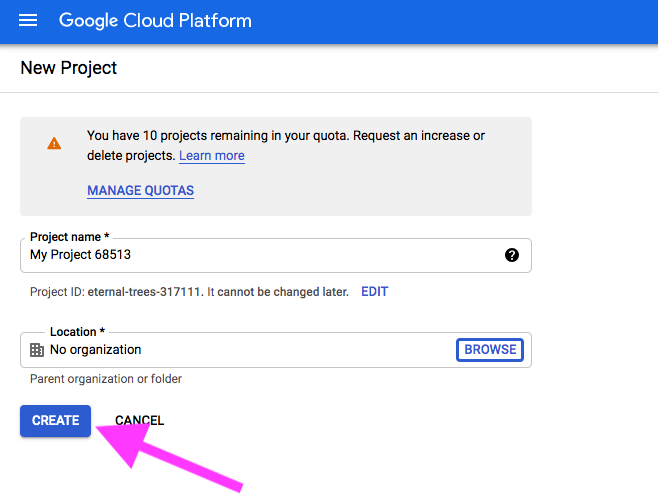
2) Create a new Google API project here - https://console.cloud.google.com/apis/dashboard
3) Name your project and click Create ↓
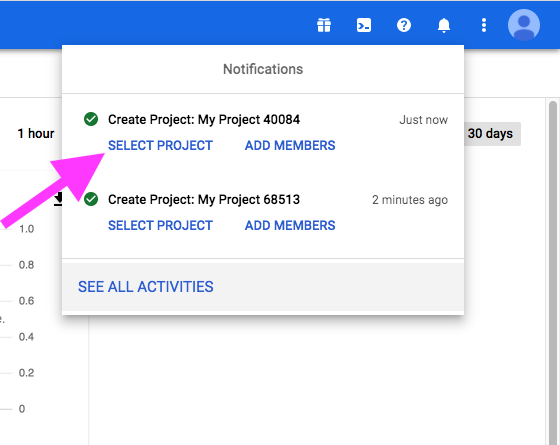
4) Select the project you have just created ↓
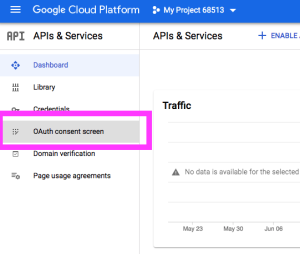
5) Open the OAuth consent screen section ↓
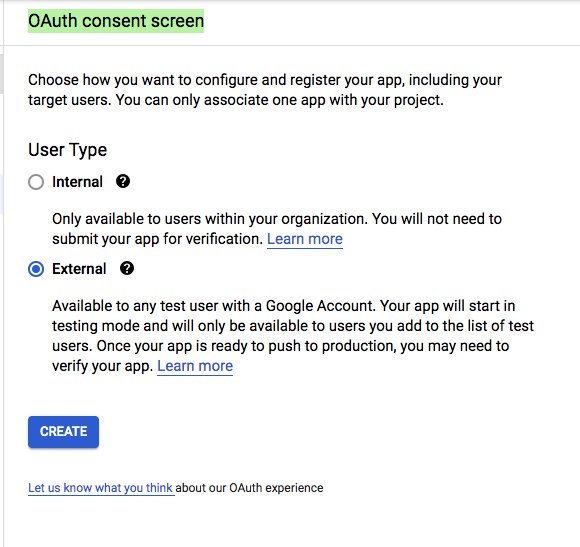
6) Make your choice between Internal and External usage. Internal is only for users from YOUR GOOGLE DOMAIN, say if your company uses Google as an email provider. Internal is quicker to publish and needs no verification.
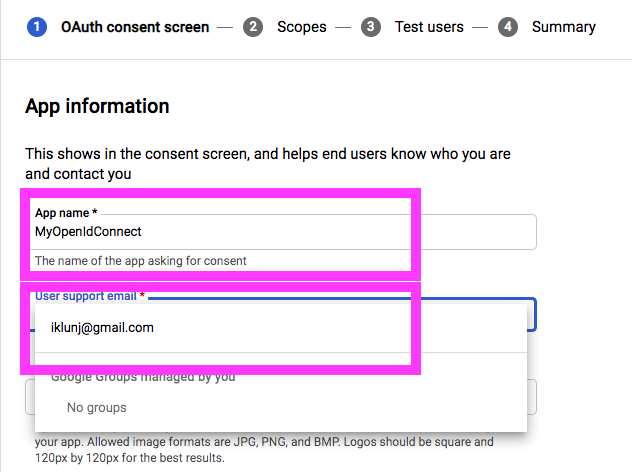
7) Fill in the information required by Google - with the App name and your company's support email
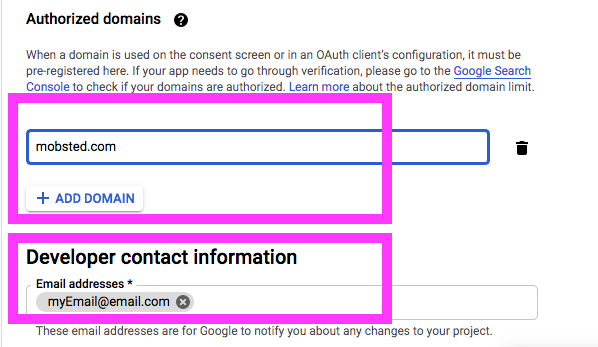
8) Add Mobsted.com as an authorized domain and your email as the developer's email
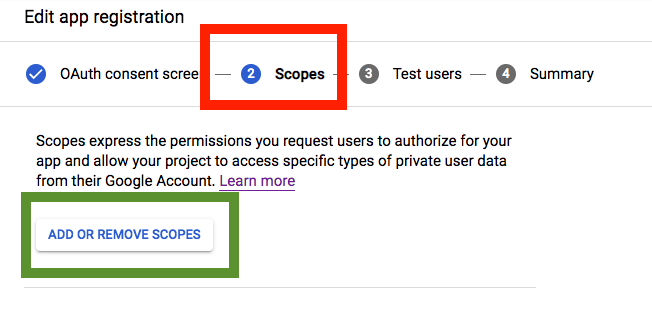
9) Go to the next step - Scopes (marked red ↓) and click the button "Add or Remove Scopes", marked green ↓
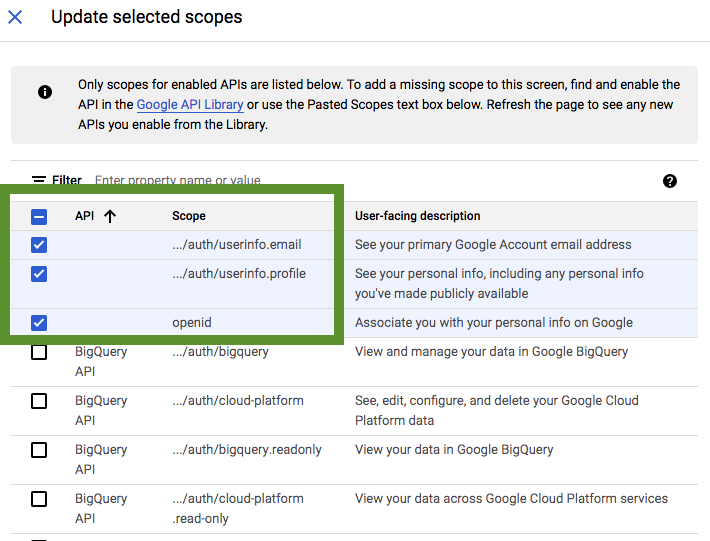
10) Choose ONLY the following scopes, then do "Update" selected scopes and "Save" to continue.
- “.../auth/userinfo.email”
- “.../auth/userinfo.profile”
- “openid”
11) Skip the following step - Test users, by pressing "Save and Continue", marked red ↓, then skip Summary by pressing "Back to Dashboard", marked magenta ↓


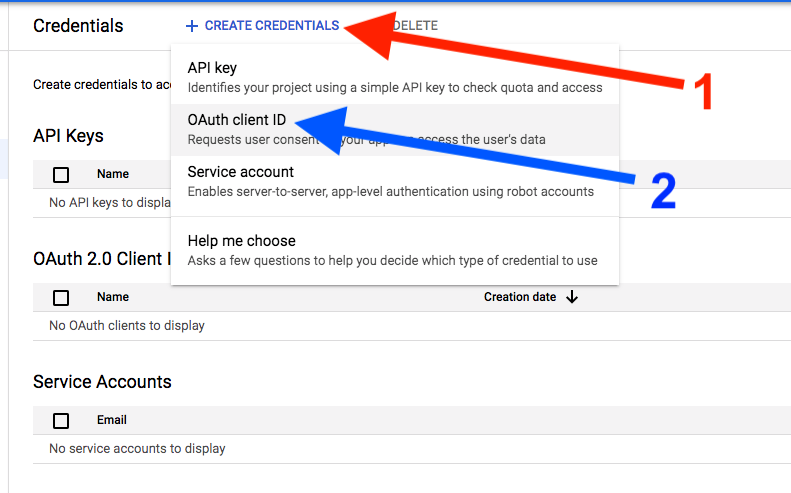
12) Open the "Credentials" section, green ↓, in Dashboard and press "+ Create Credentials", red ↓, and then "OAuth client ID" blue ↓

13) Set application type as Web Application ↓, marked magenta, and give this application any name for your internal reference, marked blue ↓
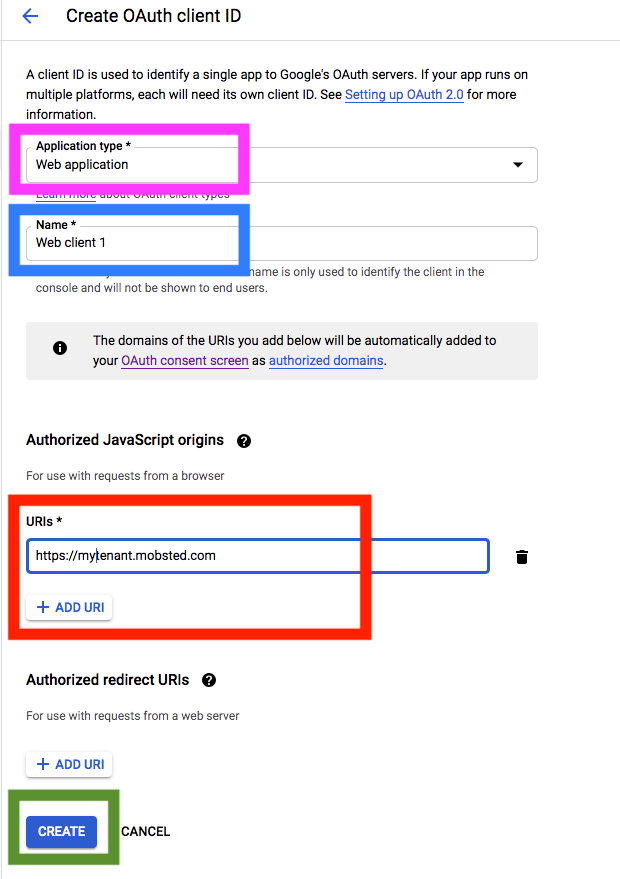
Place in your Mobsted account's full domain name marked red ↑, and add the second one if you are branding apps to your own subdomains using CNAMES, with the right subdomain name.
Press CREATE button, marked green ↑.
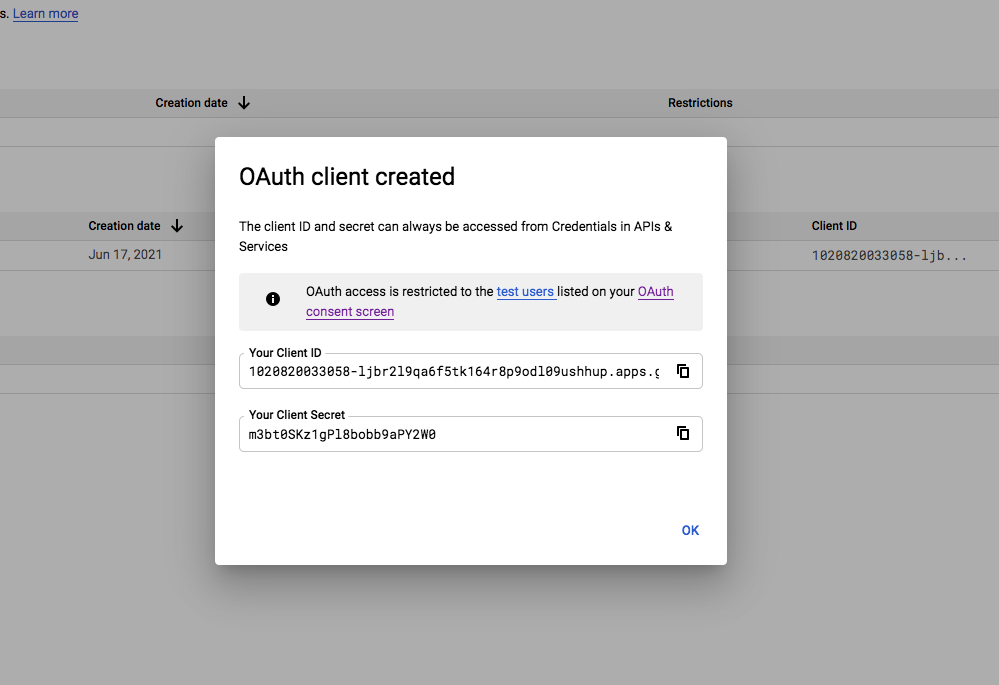
14) Copy and save "Your Client ID" and "Secret" keys to a notebook.
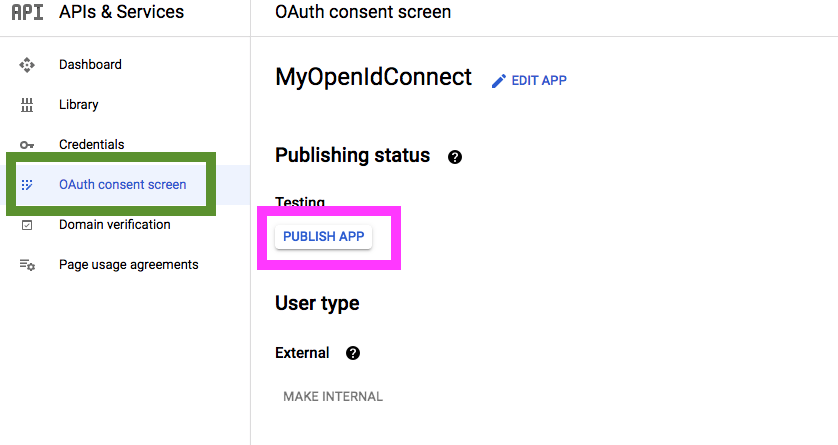
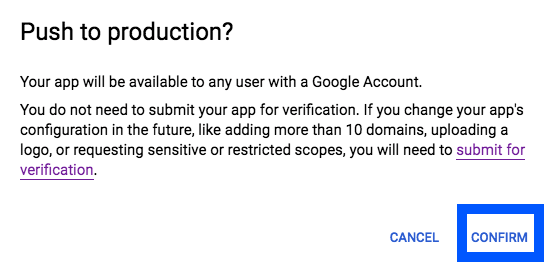
15) Go to "OAuth consent screen", marked green ↓, and press "Publish App", marked magenta ↓, then press Confirm, marked blue ↓
3. Adding Google Auth to Mobsted
1. Turn on Google Auth for the app
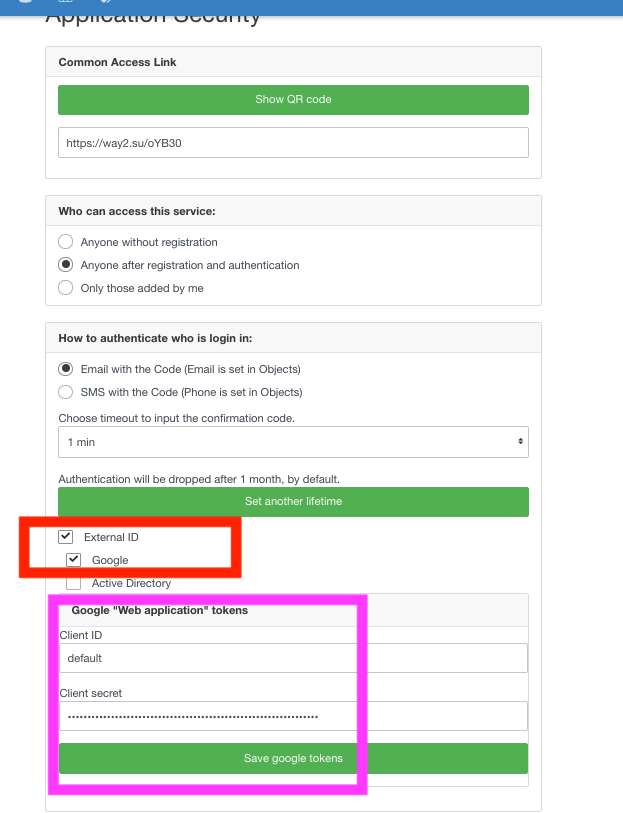
1) Open Security settings of the application, where you want to have Google Auth, you can do it from the home screen (marked blue ↓) or from the App's top menu.

2) On the Security page check the box "External ID" and select Google in it - top red box ↓, this will open a new section below, please input an ID and Secret tokens - bottom magenta box ↓, which you copied on Step 2-14 above, from your Google account.
PRESS SAVE- Green button ↑.
NOTE
External ID is an additional option for users to register or log in quicker. You still need to have a phone number or email to make sure users can recover their accounts later without using the Google SSO.
If you only need to register new users with Google, then that's it.
2. Add Google auth to any existing users in the app
You can request or offer users to ADD a google account at any time while browsing your app. This is done using actions, which can be called on any component with actions.
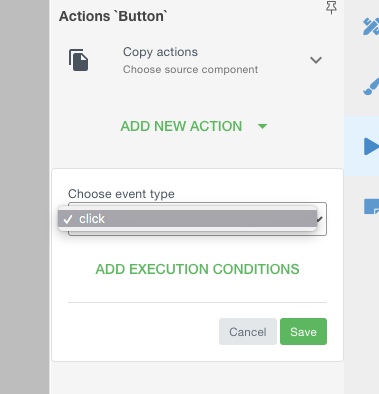
1) Inside the Constructor panel - Choose a component, which will call up Google's auth prompt and add an action to it.
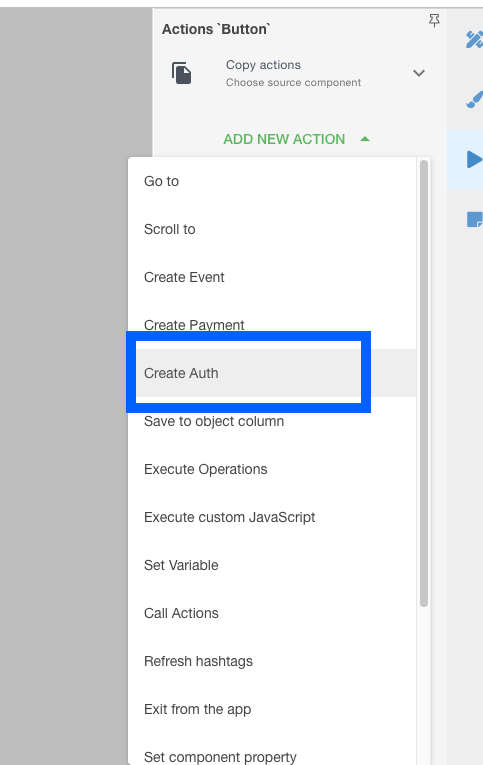
2) The Action will only work on Click. You can also add execution conditions if needed.
NOTE
Our system allows changing Google accounts for the same user in Mobsted. So if a user clicks on the action creating the connection he/she will be able to connect to another Google account. So if you do not want this, set condition checking if a google account already exists for this user, or do not use this function at all.
If you do not use this Action, sign up and login pages will be the only place to connect a Google account, and no ability to change will exist.