Where to find Security
Mobsted uses various built-in ways to authenticate your users into applications. This section can be accessed through either App's menu, magenta box ↓
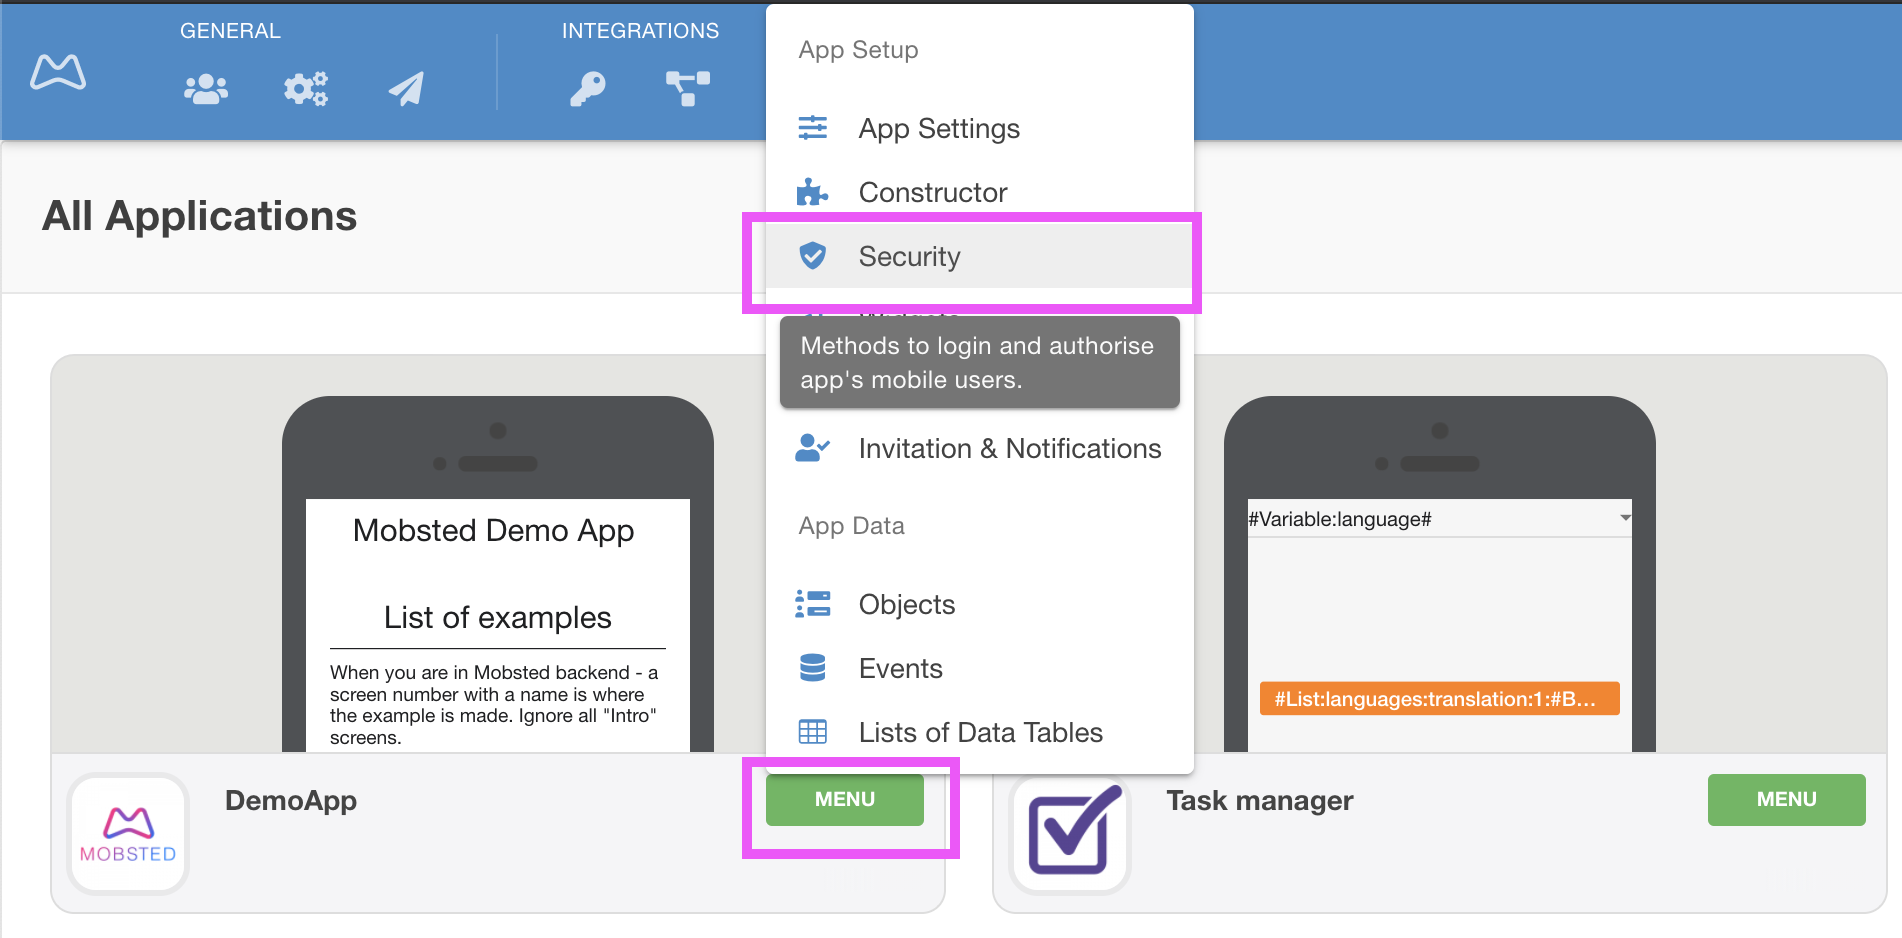
or if you are already within the application, you can see it in the top menu ↓

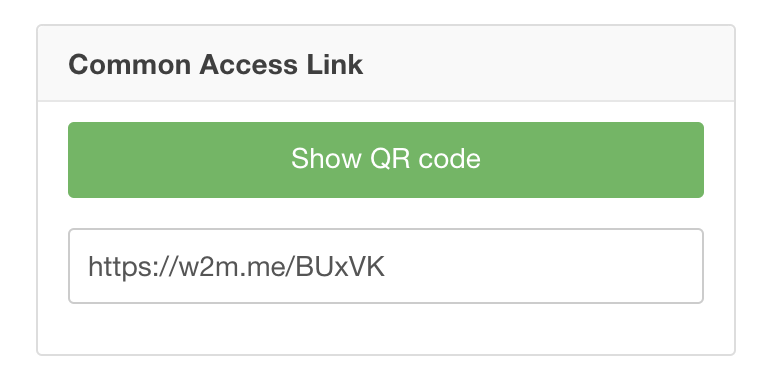
Common Access Link
This is something you can use as a central entry point for all you users before users actually install the app. When they enter the application an object/user is created and the installation will happen from that very object.
Who can access your App
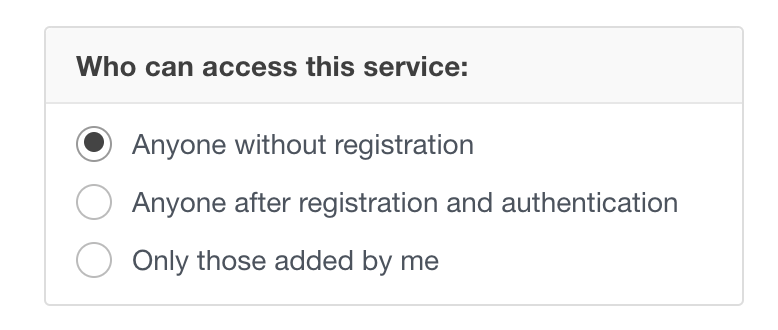
Anyone without registration.
This is will work like a normal website - anyone can access it any time. It is useful for things like marketing pages and applications. You can ask people for their names or email later in the application, but no email or phone number authentication will happen.
Anyone after registration and authentication
This is recommended when you need to get new users onboard, but need to 100% confirm either a phone number or an email. A user will be asked to enter either phone or email BEFORE he/she sees any application content.
NOTE - that what you require mobile phone or email is set in the following section below - "How to authenticate users"
Only those added by me
This is when no new users can be created by a user him/herself, but only by you, from within the service or using API exchange.
How to authenticate users login in
This section is only available when you want to register and authenticate users, or for your internally added users. So NOT for "anyone without registration".
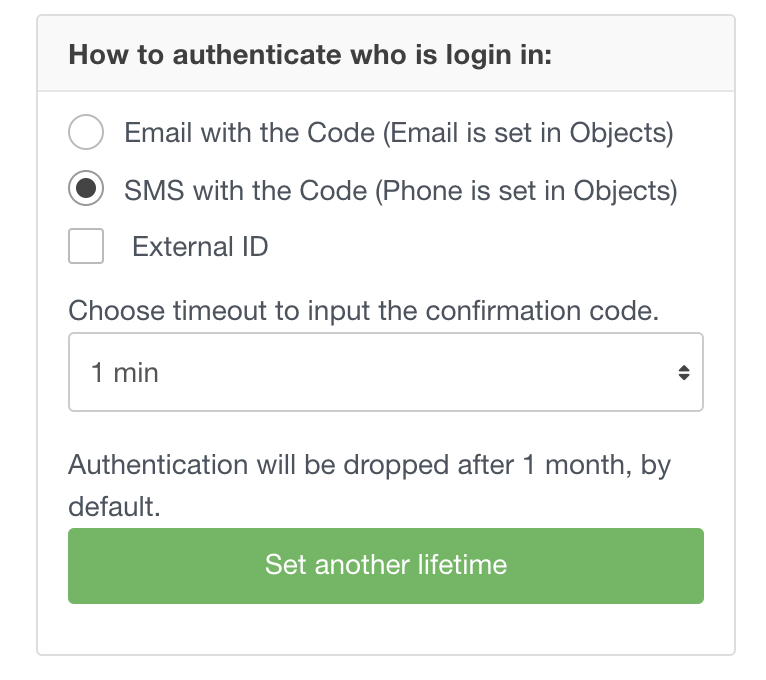
- Email - will send an email code every time a known user logs in and authentication JWT tokens have expired (sending email security codes is free). Make sure you add an "Email" column in Users/Objects table.
- SMS - text will be sent to a mobile number on the same conditions as email (NOTE that a free account only has a limited amount of SMS included, so you will need to connect your own SMS account to pay for TXT messages.) Make sure you have a "phone" column in users/objects.
- External ID - you can use external authentication services:
- like Google SSO (more social type plugins are coming soon), see here an article on how to add Google authentication for users.
- you can connect apps to your company's Active Directory service, so your employees will be recognized and given rights
- or use external OpenID Connect compliant service
NOTE 1 - External ID can work INDEPENDENTLY from the phone or email. This way if your user decides to use, say Google account, no entry of phone or email will be needed.
NOTE 2 - You can also add External IDs later on, for users with an internal phone or email auth. So, not only for users who initially registered with it. Just use an action called "Create Auth" on any button or link within your app, it will open your external ID server.
- Timeout change - you can set for how long do you need to keep authentication JWT tokens alive. The Default value is 1 month, but by pressing the "Set another time", green button ↑↑↑, you can set other lifetimes for JWT tokens (magenta ↓), access token marked blue ↓ and refresh token marked red below ↓
|
|---|
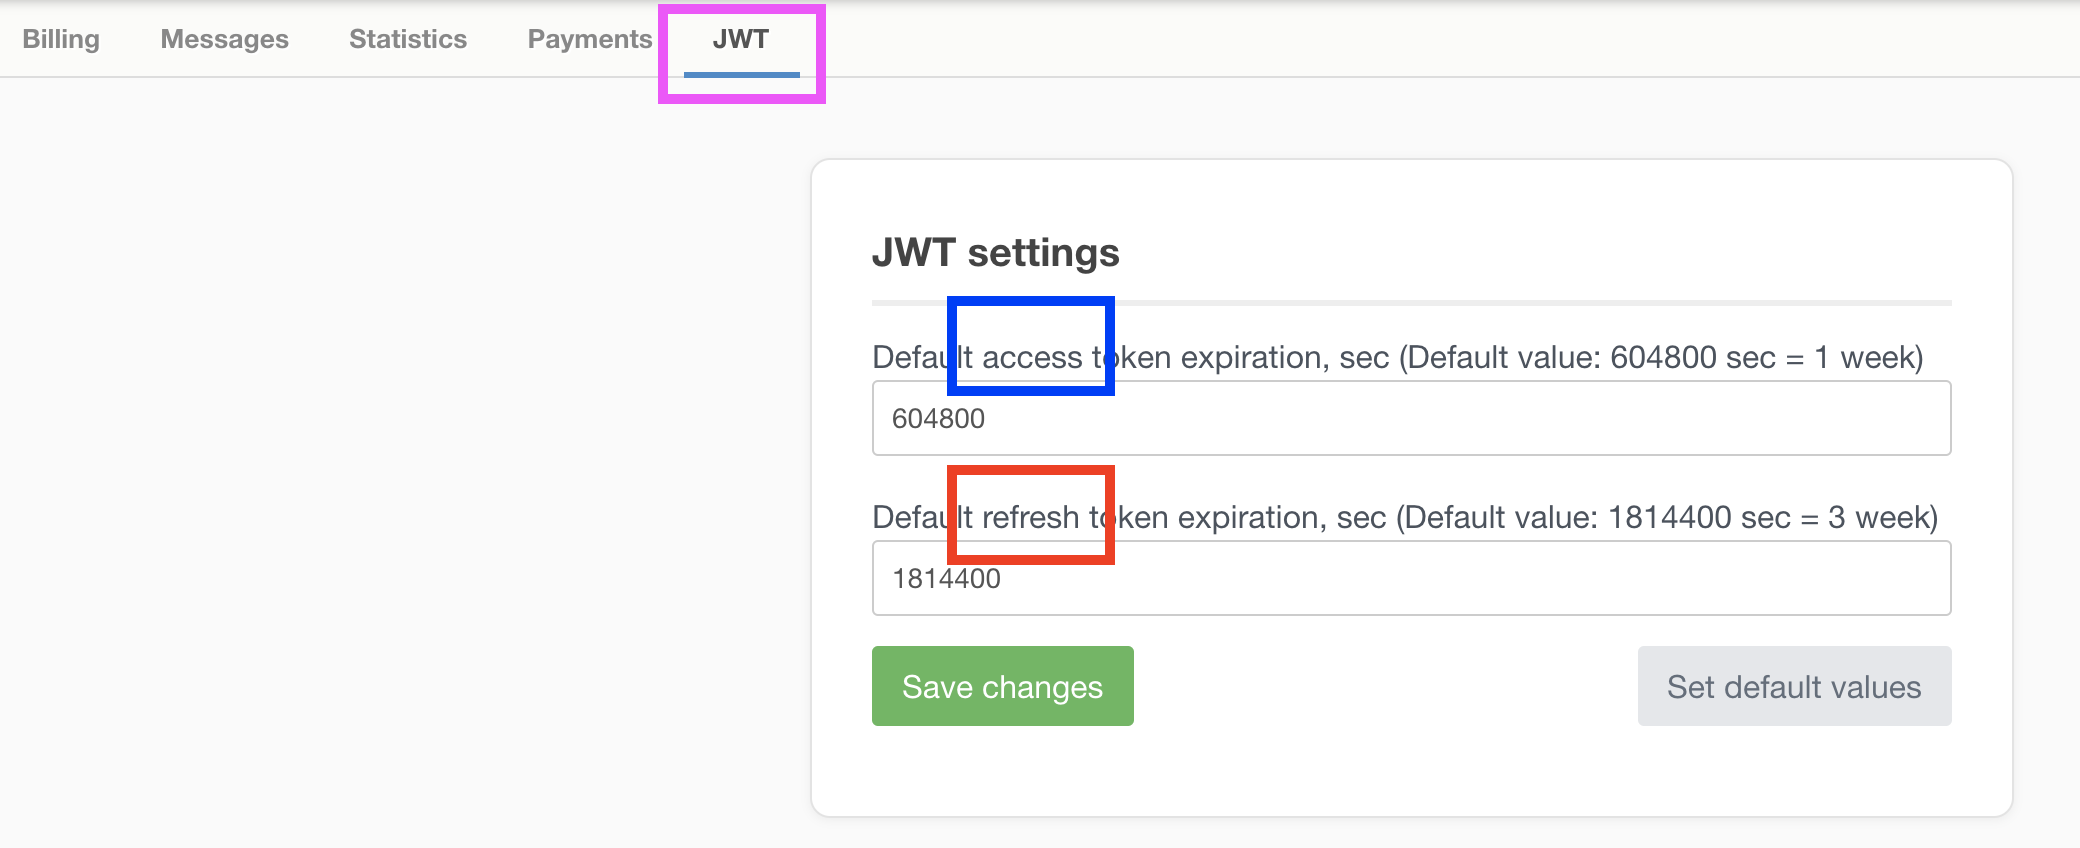
Using a combination of Access and Refresh JWT tokens you can create a security setting relevant to your application.
NOTE 1 - the refresh token is all that really matters and all that really affects users. An access token is a "session" token and used for all the calls to the user data, but a refresh token is stored on a device and used to make only one call to the server - get a new access token. So when the access token expires, the system uses refresh to get the new access. But when the refresh token expires, a user can not receive a new access token, this user is taken to the authentication page.
NOTE 2 - for maximum security apps, like baking or insurance, have access tokens expire as often as 10-30 minutes and refresh tokens expire as often as 3-6 hours, or quicker. For consumer-related-service-kind-apps, like a shop or a fitness center, set these tokens live for as long as you can afford, in order to avoid unneeded authentications by users.
Add extra security
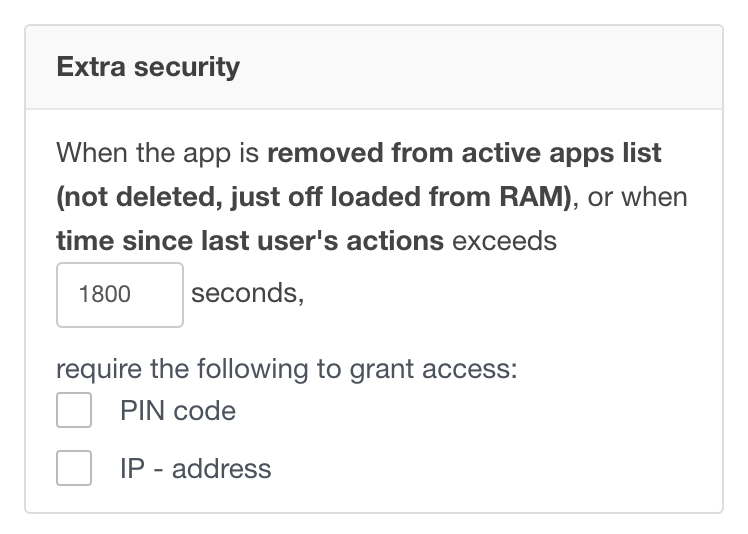
You can make additional security checks after a period of idle time, or if the user offloads the app from running memory (like swiping apps on a phone). This is needed, when for example a banking app user has it open for a while, without doing anything.
- PIN code - is something a user will need to input, as a digital PIN or a password. Make sure you add PIN code column in users/objects and that some info does exist in it.
NOTE 1 - PIN codes can be used as passwords as well, as you can pre-fill these fields for users or let them enter their own after registration and authentication with phone or email.
But we recommend using it ONLY for cases, where an app needs to stay open for a long time on a device, and several people can have access to the device.
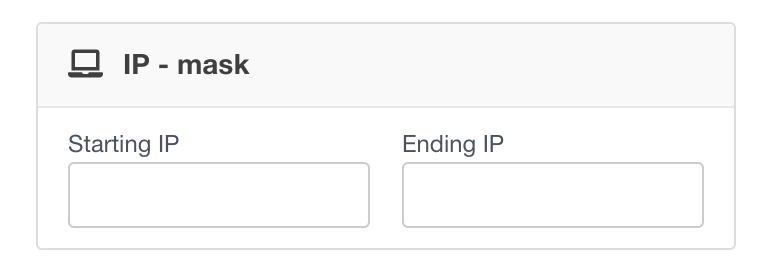
- IP Address - means a user can only login into the app from a certain range of IPs, that you add input in the area down below security page:
|
|---|
An app with secure and nonsecure zones
Often you need to create some functionality that is available for all users, and more functionality for users who registered and confirmed their phone number.
The best way to do that in terms of security is to create 2 applications and cross-link them. One will be set to "anyone can use it" and the other will be "only after registration and authentication". One can hold common functionality and the other only available to registered users. Then just make links, say on some "account button" to an app with an "authentication" block turned on. Make sure that App Saving Widgets are active on both apps.
Overall possible combinations table
| Common Link | SMS/TXT Auth | Email Auth | External ID auth | PIN code | IP range | |
|---|---|---|---|---|---|---|
| Anyone without registration | ✓ | - | - | - | - | ✓ |
| Anyone after registration | ✓ | ✓ or | or ✓ | ✓ | ✓ | ✓ |
| Only those added by me | ✓ | ✓ or | or ✓ | ✓ | ✓ | ✓ |